
If you’ve been following my closet makeover, you know this space has gone through a COMPLETE transformation.
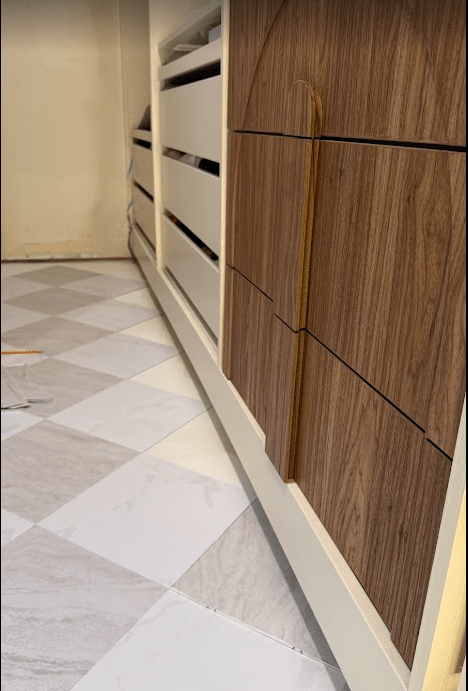
We started by ripping everything out, built a base for the IKEA PAX units, added all the cabinetry and trim to make everything look custom and then it was finally time to tackle the floor.
For this project, I used peel-and-stick floor tiles from the Chris Loves Julia x FloorPops collection, and I honestly love how much character they added to the space.
Peel-and-stick flooring sounds incredibly simple:
Peel. Stick. Done.
And technically… yes.
But if you want your floor to look straight, professional and actually stay stuck, there is a little more to it.
The installation itself isn’t difficult. The biggest things are:
floor preparation, planning your layout, taking your time with the first tiles, and making accurate cuts.
I’m breaking down the entire process from preparing your existing floor all the way through those annoying little cuts around door jambs and corners.
So if you’ve been thinking about installing peel-and-stick flooring yourself, here’s everything I learned.
Why I Chose Peel-and-Stick Tile for My Closet
For this closet, I wanted something that would make a statement without turning into another huge construction project.
I had already taken on cabinetry, carpentry, trim and painting, so I really didn’t want to start mixing mortar and cutting traditional tile.
Peel-and-stick flooring gave me that beautiful patterned-tile look without:
- Mortar
- Grout
- A wet saw
- Professional installation
- Days of drying time
The Chris Loves Julia x FloorPops collection is made from self-adhesive vinyl tiles and is designed so you can cut the tiles using a razor/utility knife or scissors. No grout is required.
For a DIY project like this closet, that made it incredibly approachable.
But here’s the most important thing I learned:
A peel-and-stick floor is only as good as the floor underneath it.
You can buy beautiful tiles and install them perfectly, but if the surface underneath is dusty, uneven, greasy or loose, you’re going to have problems.
So before we even talk about peeling the backing off a tile, let’s talk about prep.
What You’ll Need
Before you start, gather everything.
Trust me, you don’t want to have adhesive exposed on a tile and suddenly realize your utility knife is in the garage.
Here’s what I recommend:
- Peel-and-stick FloorPops tiles
- Extra tiles for cuts and mistakes
- Tape measure
- Pencil
- Chalk line or laser level
- Carpenter’s square
- Sharp utility knife
- Cutting mat or scrap board
- Heavy-duty scissors, optional
- Paper or cardboard for templates
- Putty knife
- Vacuum
- Mop or cleaning cloths
- Floor-safe degreasing cleaner
- Appropriate floor patch or leveling compound if needed
- Primer if required for your flooring
- Small hand roller or flooring roller
- Knee pads
And yes…
Knee pads.
I always underestimate how much time I will spend crawling around on the floor during projects like this.
Your knees will thank you.
STEP 1: Order More Tile Than Your Exact Square Footage
Before buying your flooring, measure your room.
Multiply:
Room length × room width = square footage
For example, if your room is:
5 ft × 16 ft = 80 square feet
Do NOT buy exactly 80 square feet of flooring.
You’ll need additional material for:
- Cuts
- Pattern matching
- Mistakes
- Damaged tiles
- Odd corners
- Future repairs
If you’re installing your tiles diagonally or creating a more complicated pattern, you’ll generally create more offcuts than with a simple straight installation.
I would much rather have a few tiles left over than discover I’m two tiles short when the collection is temporarily out of stock.
Also save a few extras after the project is complete.
If one tile ever becomes damaged, you’ll have an exact match available.
STEP 2: Open Your Boxes and Acclimate the Tiles
Do not bring your tiles home from a hot garage or delivery truck and immediately start sticking them down.
FloorPops recommends allowing the packages to lie flat and acclimate to the room for approximately 48 hours before installation.
Put the boxes in the actual room where you’ll be installing them.
Lay them flat.
This allows the material to adjust to the temperature of the space before installation.
And don’t store the boxes standing vertically against the wall if you can avoid it.
You want the tiles to remain nice and flat.
STEP 3: Remove Everything From the Floor
You need a completely clear workspace.
Remove:
- Furniture
- Rugs
- Shoe racks
- Loose shelving
- Floor registers if possible
- Transition strips if you’re replacing them
If you can remove the baseboards before installation, that can make the edges incredibly clean because your perimeter cuts will eventually be covered by the baseboard.
If your baseboards are staying, that’s okay too—you’ll just need to make more precise perimeter cuts.
STEP 4: Inspect Your Existing Floor
Now get down close and actually LOOK at the floor.
Peel-and-stick tiles need a good surface underneath them.
FloorPops calls for a surface that is clean, smooth, flat and dry, and warns against installing over loose or uneven flooring.
Look for:
- Loose flooring
- Raised seams
- Cracks
- Holes
- Nail heads
- Staples
- Old adhesive
- Paint drips
- Dried caulk
- Construction debris
- Uneven transitions
- Deep grout joints
Anything you can feel through the floor now has the potential to show through—or affect adhesion—later.
STEP 5: Remove Old Carpet and Tack Strips, If Necessary
In my closet, we removed the existing carpet first.
And I have to admit, tearing out perfectly functional flooring always gives me a tiny moment of:
Are we really doing this?!
But once it’s gone…
There’s no going back.
If you’re removing carpet, you’ll typically need to deal with:
- Carpet
- Padding
- Tack strips
- Staples
- Nails
Be extremely careful removing tack strips because those little nails are SHARP.
After everything is removed, run your hand—or preferably a scraper—across the subfloor.
You would be surprised how many tiny staples remain behind.
Remove every one.
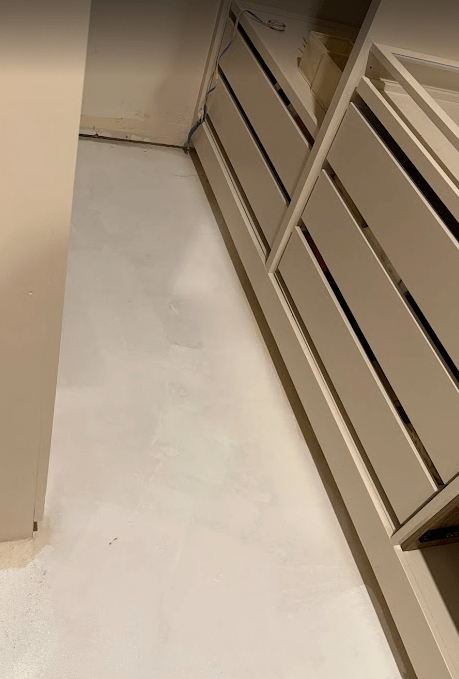
STEP 6: SCRAPE the Floor
This is the unglamorous part nobody wants to put in the Instagram Reel.
But it’s SO important.
Use a floor scraper or putty knife to remove:
- Paint blobs
- Joint compound
- Dried drywall mud
- Caulk
- Glue
- Construction debris
- Anything raised
Run your scraper almost flat against the floor.
You’ll hear and feel it catching on imperfections.
Keep working until the scraper moves smoothly across the surface.
STEP 7: Fill Holes and Low Areas
Your surface doesn’t have to be museum-perfect.
But it should be reasonably flat.
If you have:
- Deep gouges
- Large cracks
- Missing sections
- Deep grout lines
- Significant depressions
address those before continuing.
Use a floor patch or leveling product appropriate for your existing flooring/subfloor and follow that product’s directions.
Allow it to dry completely.
Then gently sand or scrape any raised edges if needed.
Chris Loves Julia has also demonstrated patching the substrate before installing FloorPops, with the prep occurring before the tiles were laid.
Don’t rely on the new vinyl tile to hide a bad floor underneath it.
What If You’re Installing Over Existing Tile?
Peel-and-stick flooring can sometimes be installed over an existing hard flooring surface if that surface is suitable.
But pay attention to the grout lines.
Deep grout joints may eventually telegraph through thin flooring.
If your grout lines are significant, they may need to be filled or skimmed to create a smoother surface.
Another excellent tip from Chris Loves Julia is:
Don’t place your new FloorPops seams directly over the existing grout seams.
Offsetting them helps reduce the chance of the underlying grout pattern affecting your new tile installation.
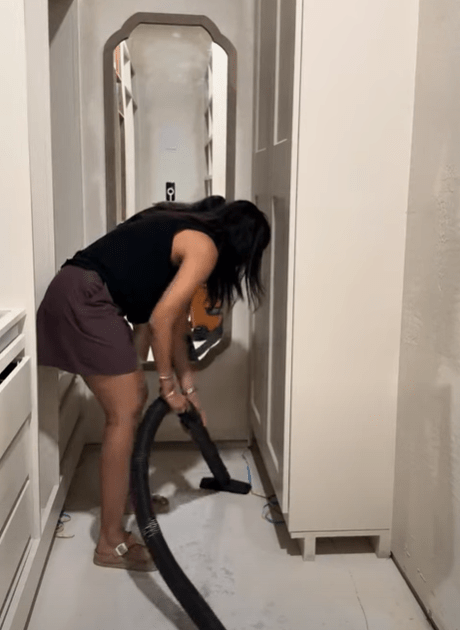
STEP 8: Vacuum. And Then Vacuum Again.
Once your repair work is done, vacuum the ENTIRE floor.
Then get into:
- Corners
- Along baseboards
- Door jambs
- Floor vents
- Cabinet edges
You don’t want a single little pebble trapped underneath your tile.
Seriously.
A tiny piece of debris can create a bump that you will notice every time you walk across it.
STEP 9: Wash and Degrease the Floor
Vacuuming removes loose debris.
Cleaning removes what you can’t necessarily see.
The surface should be free of:
- Grease
- Wax
- Oils
- Cleaning-product residue
- Dirt
These substances can interfere with adhesive.
FloorPops specifically notes that grease, dirt, wax and oils should be removed before installation.
Use a cleaner appropriate for your existing floor.
Then rinse if your cleaner requires it.
You DON’T want to leave a slippery cleaning-product film behind.
STEP 10: Let the Floor Dry Completely
This isn’t the time to get impatient.
The floor needs to be completely dry before you install your tile.
If you just mopped it, give it enough time.
Pay special attention to:
- Corners
- Cracks
- Seams
- Areas next to trim
Moisture can hide in those areas longer than you think.
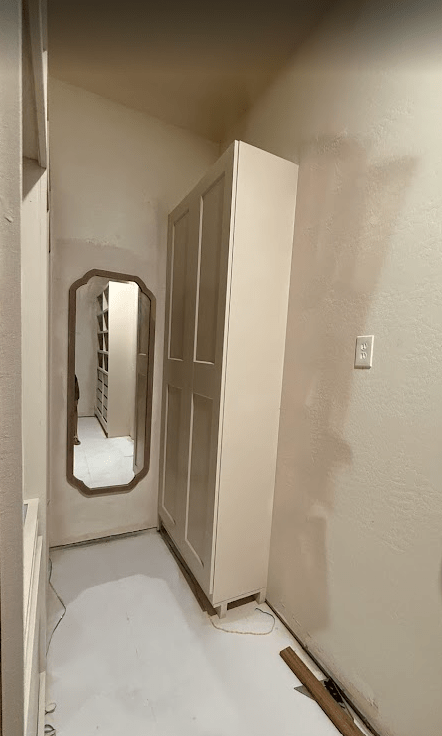
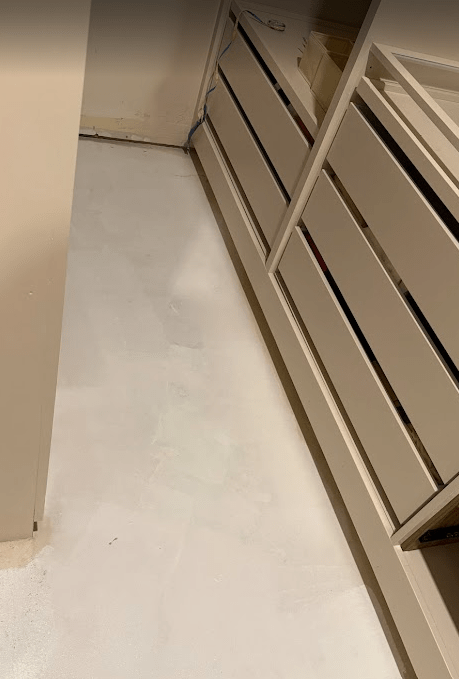
STEP 11: Determine Whether You Need Primer
Whether your floor needs primer depends on the surface underneath.
For example, porous surfaces such as some concrete or plywood installations may require an appropriate primer to help achieve reliable adhesion.
FloorPops specifically notes that concrete requires primer adhesive for secure installation.
This is one of those situations where I wouldn’t randomly choose a primer from the garage.
Check the current FloorPops instructions and use a product appropriate for both your flooring and your substrate.
NOW COMES THE REALLY IMPORTANT PART:
PLAN YOUR TILE LAYOUT BEFORE STICKING ANYTHING
Please don’t start in a random corner.
I know peel-and-stick makes you want to immediately peel one and stick it down.
Resist.
Your FIRST row determines everything that follows.
If your first row is crooked by even a little bit, that error compounds across the room.
By the time you reach the opposite side…
Your floor can look visibly crooked.
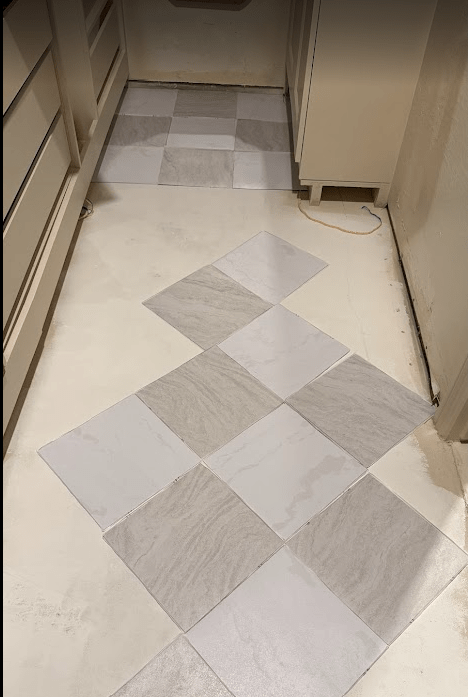
STEP 12: Decide Which Direction Your Pattern Will Run
Take several tiles out of the boxes.
Don’t peel anything.
Dry-lay them on the floor.
Try different orientations.
If you’re using a directional pattern, rotate the tiles and decide how you want the design to flow.
Look at the floor from:
- The doorway
- Inside the closet
- The main room outside the closet
The view from the doorway matters a LOT.
That’s usually the first perspective people see. I started with the doorway as that was the entry point to this closet.
STEP 13: Mix Tiles From Different Boxes
This is one of my favorite little flooring tricks.
If your design has variation in color, veining or printing, don’t necessarily finish one entire box before opening another.
Mix tiles from several boxes.
Lay some out and compare them before installing.
That helps distribute any small variations naturally across the room instead of creating one section that looks slightly different.
STEP 14: Find Your Centerline
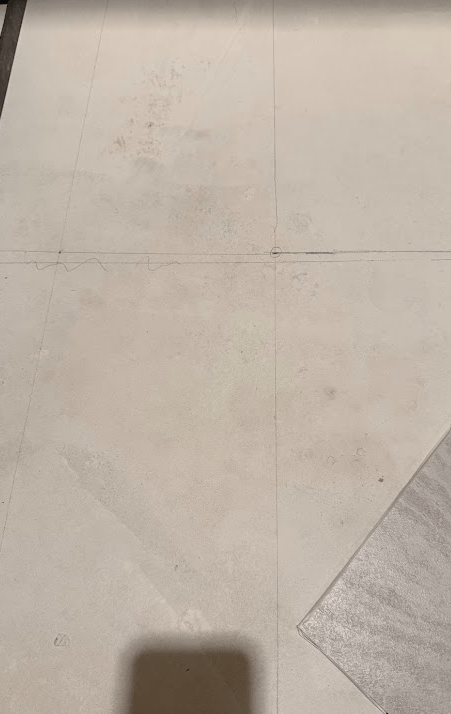
One reliable approach is to locate the center of the room.
Measure the width of the room and mark the midpoint on opposite walls.
Snap a chalk line—or use a laser—to connect those points.
Then do the same thing in the opposite direction.
Where those two lines intersect is the center of the room.
FloorPops’ installation guidance recommends starting from the center of the room.
But there is another consideration:
Your visual focal point.
In a closet, sometimes centering the pattern perfectly at the doorway gives you a better visual result than blindly centering everything mathematically.
That’s why I always dry-lay first.
STEP 15: Dry-Lay an Entire Row
Without removing ANY backing, place a row of tiles along your reference line.
Now look at what happens at both walls.
Imagine you end up with:
11 inches on one side and 1 inch on the other.
That 1-inch sliver is going to be annoying to cut and won’t look nearly as intentional.
Shift your starting line slightly so you get something closer to:
6 inches and 6 inches.
Much better.
The goal is to avoid tiny awkward strips whenever possible.
STEP 16: Pay EXTRA Attention to Patterned Floors
Pattern makes alignment much less forgiving.
The Chris Loves Julia x FloorPops collection has some beautiful graphic layouts, which means even a small alignment issue may become noticeable.
Lay out several tiles before installation.
Look at:
- Pattern direction
- Veining
- Corners
- Repeating shapes
- The relationship between adjacent tiles
WallPops specifically recommends measuring and mapping patterned installations before you begin sticking tiles down.
What About Installing the Tiles on a Diagonal?
If you want that elevated diamond or harlequin effect…
It is BEAUTIFUL.
It is also slightly more work.
Instead of placing the tile sides parallel to the walls, you’re essentially turning your square tiles 45 degrees.
The layout becomes much more important because the pattern is extremely visible.
Establish an accurate reference line first.
Then dry-lay several tiles so their corners follow that line.
Expect more cuts at the perimeter.
But the finished look?
So worth it.
STEP 17: Install Your First Tile
Now we’re finally sticking something!
Choose your carefully planned starting position.
Peel the backing away.
Try not to touch the adhesive more than necessary.
FloorPops specifically cautions against touching the adhesive because dirt, dust and oils can interfere with adhesion.
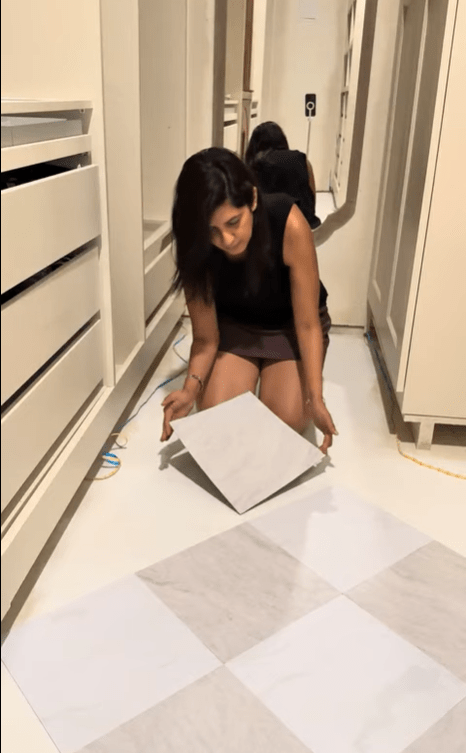
Hold the tile slightly above the floor.
Line it up with your reference lines.
Don’t press the entire thing down immediately.
Get one edge positioned correctly first.
Then gently lower the rest into place.
Once you’re confident it’s straight:
PRESS.
Firmly.


STEP 18: Press From the Center Outward
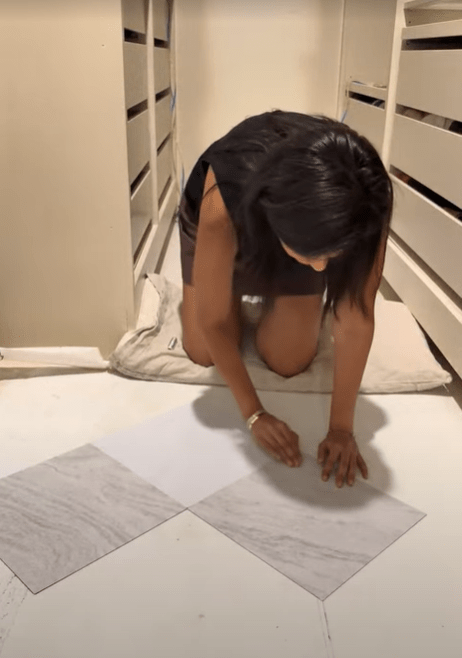
Once the tile is positioned correctly, press firmly from the center toward the edges.
This helps create good contact between the adhesive and the floor.
Pay special attention to:
- Corners
- Edges
- Seams
Use your hands initially.
Then go over the tile firmly with a roller if you’re using one.
STEP 19: Install Your Second Tile VERY Carefully
The second tile matters almost as much as the first.
Place it right next to the first tile.
You want the seam to be:
Tight—but not overlapping.
Don’t intentionally leave grout gaps unless the product and installation method you’re using specifically calls for them.
These tiles are designed to butt against each other.
Align one edge.
Check the pattern.
Then lower the tile.
STEP 20: Don’t Let Tiny Alignment Errors Accumulate
This is a big one.
After every few tiles, stop.
Stand up.
Look across the floor.
Check against your reference line.
It’s much easier to correct something after two tiles than after twenty.
Don’t assume:
“I’ll fix it in the next row.”
Usually, that makes it worse.
STEP 21: Work Outward in Sections
Once your first tiles are perfectly aligned, continue working outward.
I like working in manageable sections rather than randomly filling areas around the room.
Keep checking:
- Your seams
- Your pattern
- Your reference line
And occasionally stand at the doorway.
Sometimes something that looks straight when you’re 12 inches away becomes obviously crooked when you see the whole room.
NOW FOR THE PART EVERYONE ASKS ABOUT:
HOW DO YOU CUT PEEL-AND-STICK FLOOR TILE?
This is actually much easier than cutting ceramic or porcelain tile.
One of the reasons I love these tiles is that you don’t need a wet saw.
FloorPops says the tiles can be cut using a razor blade or scissors.
For most straight cuts, I prefer:
Utility knife + straightedge.
STEP 22: Measure Your Cut
When you reach a wall, measure the distance from your last installed tile to the wall.
Measure BOTH ends.
Why?
Because walls aren’t always perfectly straight.
You may have:
- 6 1/4 inches at one end
- 6 1/8 inches at the other
Measure.
Don’t assume.
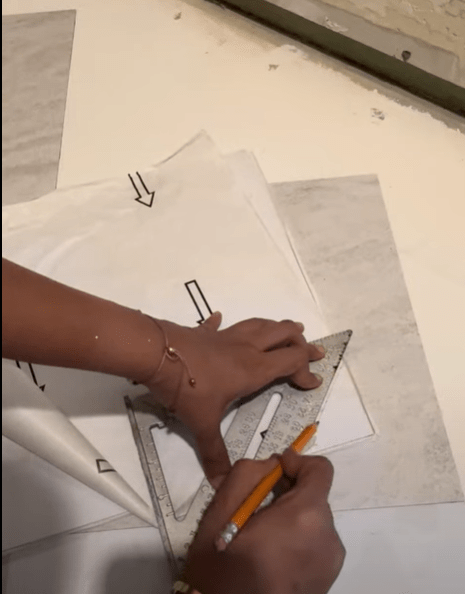
STEP 23: Transfer the Measurement to Your Tile
Keep track of the orientation of your tile.
This is especially important with patterned flooring.
It is incredibly easy to beautifully mark your cut…
cut it perfectly…
walk over to install it…
and realize you cut the wrong side.
Yes.
Been there.
Before cutting, I like to mark the BACK of the tile with an arrow showing which side faces the wall.
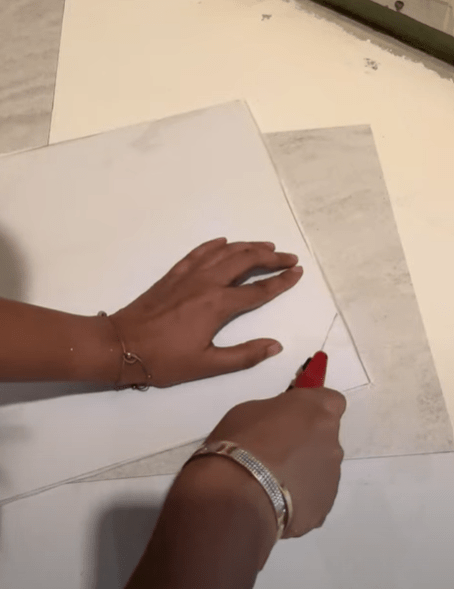
STEP 24: Use a Straightedge for Straight Cuts
Place your tile on a protected cutting surface.
Line your straightedge up with your measurement.
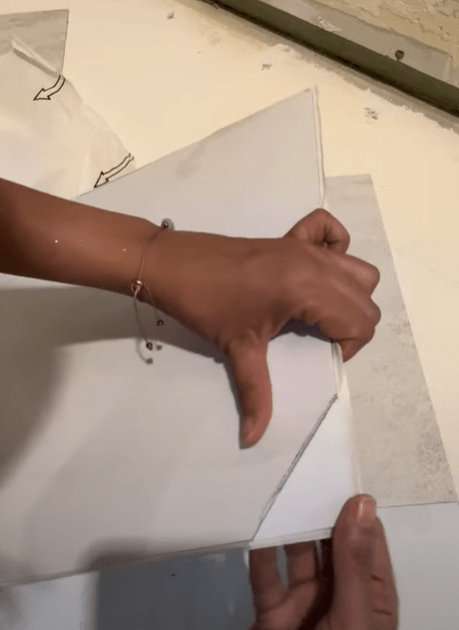
Then score along your line using a sharp utility knife.
Don’t try to violently cut through the entire tile in one pass.
Instead:
Score → score again if necessary → bend → cut through remaining material.
A sharp blade makes a huge difference.
Change Your Utility Knife Blade OFTEN
Please do this.
A dull blade:
- Wanders
- Tears
- Requires more pressure
- Makes cuts less precise
- Makes you more likely to hurt yourself
Utility blades are cheap.
Your fingers are not.
Change the blade as soon as it starts dragging.
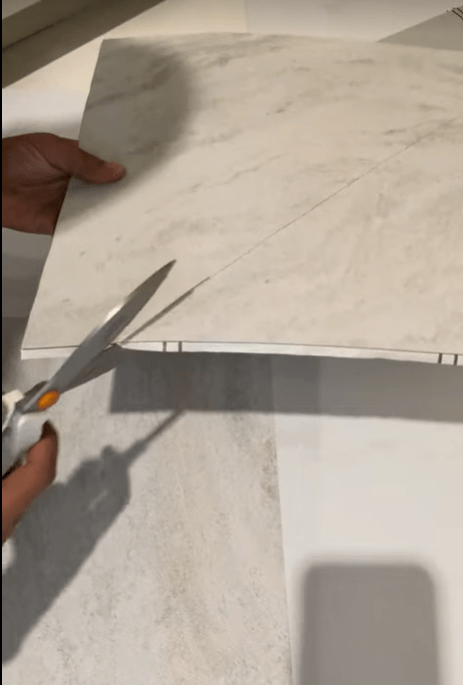


STEP 25: Always Dry-Fit the Cut Tile
Do NOT peel off the backing immediately after cutting.
First…
Place it where it belongs.
Check:
- Width
- Pattern
- Orientation
- Wall clearance
- Seam
If something needs adjusting, now is the time.
Not after you’ve exposed the adhesive.
STEP 26: Make Templates for Weird Cuts
This technique will save your sanity.
Not every cut is a straight rectangle.
You’ll eventually meet:
- Door frames
- Corners
- Angled walls
- Pipes
- Odd trim
- Cabinet corners
Instead of trying to measure six different dimensions…
Make a paper template.
Use:
- Printer paper
- Kraft paper
- Cardboard
Cut the paper until it fits the obstacle perfectly.
Then place the template on top of your FloorPop tile.
Trace it.
Cut along your line.
SO much easier.
My Favorite Trick for Complicated Corners
Use multiple small pieces of paper or painter’s tape to create your template.
Build the exact shape around the obstacle.
Then transfer that shape onto your tile.
This is especially helpful around door jambs where there may be three or four different little angles.
STEP 27: Cutting Around Door Jambs
Door jamb cuts are probably the most annoying part.
Don’t eyeball them.
Make a template.
Take your time.
And remember:
A cut that will eventually be covered by trim doesn’t need to be absolutely microscopic-perfect.
A visible cut does.
Spend your perfectionism where people will actually see it.
STEP 28: Cutting Around Floor Vents
If you have a floor vent, don’t try to cut the opening before determining exactly where the tile sits.
Position the tile.
Measure the vent location carefully.
Transfer those measurements to the tile.
Cut the opening.
Then dry-fit BEFORE removing the backing.
If the vent cover overlaps your cut slightly, you have a little forgiveness.
STEP 29: USE OFFCUTS
Don’t throw every scrap piece away.
Larger leftover pieces can often be used:
- Along another wall
- Inside a closet corner
- Around a vent
- Under cabinetry
Create a scrap pile organized roughly by size.
This can dramatically reduce waste.
STEP 30: Keep Checking the Pattern as You Go
This matters more with patterned flooring than plain flooring.
Every few rows, step back.
Look from the entrance.
Your eyes can catch a pattern alignment issue incredibly quickly when you’re farther away.
It is much easier to fix a tile now than after you’ve completed the whole room.
STEP 31: Press the Entire Floor Down Firmly
Once you’re satisfied with the installation, go over the entire floor carefully.
Press:
- Every tile
- Every seam
- Every corner
- Every perimeter edge
If you have a flooring roller, this is the time to use it.
You’re trying to establish firm contact between the adhesive and the substrate across the entire tile.
STEP 32: Finish Your Perimeter
Depending on your installation, your edges may be finished with:
- Baseboards
- Shoe molding
- Quarter round
- Appropriate perimeter caulk where recommended
Chris Loves Julia has specifically recommended caulking the edges along the walls in its FloorPops installations.
In my closet, all of those finishing details matter because the goal isn’t for anything to look temporary.
I want the IKEA PAX.
The trim.
The flooring.
The base.
Everything…
to feel like ONE custom-built space.
STEP 33: Clean Your New Floor Properly
Once everything is installed, follow the flooring manufacturer’s cleaning recommendations.
One important tip from Chris Loves Julia is to avoid steam mops on FloorPops because prolonged heat and forced moisture can weaken the adhesive over time.
A regular damp-floor cleaning method is a much safer option.
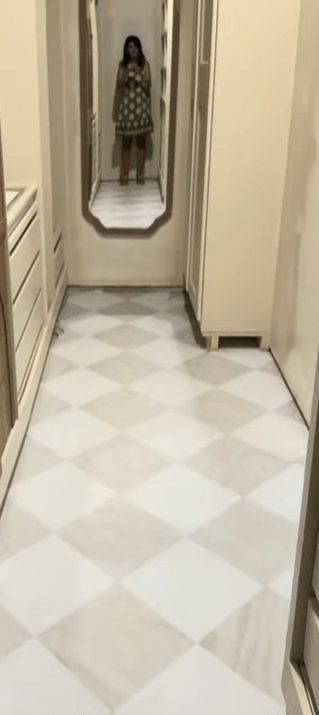
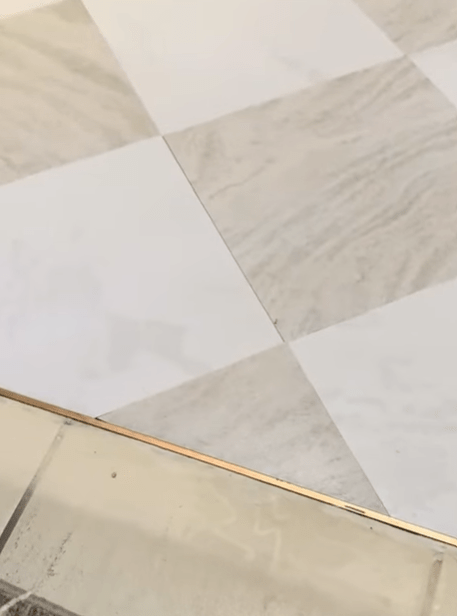

What I Would NOT Do When Installing Peel-and-Stick Tile
After doing this project, there are definitely a few things I would avoid.
DON’T install over dust.
Even if your floor looks clean…
Vacuum it.
DON’T skip layout planning.
Five extra minutes of planning can save you an hour of fixing crooked tiles.
DON’T start against a wall assuming the wall is straight.
Houses are rarely perfectly square.
Use a reference line.
DON’T peel the backing before checking your cut.
Always dry-fit.
DON’T cut everything with one dull utility blade.
Change blades frequently.
DON’T randomly rotate patterned tiles.
Decide on your pattern first.
DON’T force a slightly crooked tile.
Small errors multiply.
Fix them immediately.
DON’T ignore substrate problems.
Peel-and-stick flooring will not magically fix a bad floor.
My Biggest Tip: Spend More Time on the First Row
If you remember only ONE thing from this entire tutorial…
Make it this:
Your first row is more important than your last ten rows.
I probably spend three times as long placing the first few tiles as I do placing the tiles in the middle of the floor.
Because once those first tiles are perfectly aligned…
everything else has something accurate to follow.
Is Peel-and-Stick Flooring Beginner Friendly?
YES.
This is genuinely one of those DIY projects that can make a huge visual impact without requiring specialized tools.
You don’t need:
- A tile saw
- Mortar
- Grout
- Tile spacers
- Days of installation
But beginner-friendly doesn’t mean you should rush it.
The actual sticking is easy.
The professional-looking result comes from:
Prep + layout + precise cuts + patience.
How Long Does It Take?
That completely depends on the size and complexity of your room.
The middle of the room goes FAST.
The perimeter?
That’s where you’ll spend your time.
A room with four simple walls will move much faster than a space with:
- Multiple doorways
- Cabinetry
- Closets
- Angles
- Floor vents
So when you’re estimating your project time, don’t count tiles.
Count cuts.
Is Peel-and-Stick Flooring Worth It?
For this closet?
Absolutely.
It completely changed the feeling of the space.
The biggest surprise for me was how something as simple as the flooring could help make the entire IKEA PAX installation feel more intentional and custom.
Instead of the flooring being an afterthought, it became part of the design.
And because the Chris Loves Julia FloorPops have such a beautiful pattern, they give you that designer tile feeling without taking on an actual tile installation.
Would I Use FloorPops Again?
For the right room…
100%.
Especially for a closet, laundry room, powder room or another space where you want a big design moment without committing to traditional tile installation.
It’s also an incredibly satisfying DIY project because the transformation happens SO quickly.
One minute you’re staring at an old floor…
and a few tiles later you’re thinking:
WAIT. This actually looks GOOD.
And that’s basically how this entire closet makeover has gone.
Questioning my decisions…
Making a giant mess…
And then finally seeing everything come together.
Totally worth it.
If you’re planning your own peel-and-stick flooring project, save this guide before you start, and whatever you do…
Don’t peel that first tile until you’ve planned your layout!
Share this:

Categories: Uncategorized

