
Someone asked me other day, “What is that ONE thing you miss about India after living abroad?”. My instant answer was my family and festivals. Especially, DIWALI. All NRIs feel extremely homesick, which is further rubbed in by constant wishes from relatives back home. It makes you wonder whether it was really worth leaving the festivities, hustles, fun and frolic back home and settle here instead.
Yes, there are celebrations abroad, in every Indian household but can the original feeling even be brought back? I get the most patriotic outbursts during these occasions. Be it the US, the Gulf or the Far East, your home will always remain home; your root, your existence and nothing replaces the festive bonanzas. I have always wanted my children to cherish and celebrate Diwali the same way as I did and even better. Every year we involve our kids to deck up house for Diwali, decorating front yard with rangoli, performing pujas (ritual offerings), dressing up in Indian wear to school and much more. With time, these are the Diwali traditions that they look forward to! It’s a win for this momma trying to hold on to my roots and imparting those values to gen next!
This year, life was on an express lane leaving very less time for me to work on projects. On routine phone conversation with my parents, I mentioned that I really want to add some more marigold chandeliers I had created earlier but just haven’t found the needed time. Fast forward a month, I received the most surprising package from them.. GUESS WHAT!! THEY MADE ME 5 CHANDELIERS!!!!! Like HOW? How did I get SO LUCKY!!!!!!!
I posted this on my social media accounts and it received so much LOVE and AFFECTION from around the world! BUT, every other request was HOW can we make it too? So here it is, everything you need to know to create your own Marigold Chandeliers!
Supply List (For one Chandelier)
(The garlands come in a set of 10, you can choose to use just 10, however, mine uses 12)
4.5″ Large Bell
Anchor (No pre-drill required)
Needle, Scissors and a TV show to binge!
Let’s do this!
Now first step is completely optional, but if you want the chandeliers to look fuller and have solid color you can take this extra step.
- (Optional) Some garlands come with a marigold flower and stems. To me, they looked very sparse and I wasn’t a fan of green stems between those gorgeous flowers. So I took apart each flower from the garland, removed the stems and started sewing those flowers together. You can totally keep the flowers with the stems if you prefer that way. The ones I have linked are more fuller and don’t need you to worry about this step.
- Let’s talk pattern. Every alternate string contains bells, so if you are like me and sewing these flowers into garland, we first start sewing the bells.
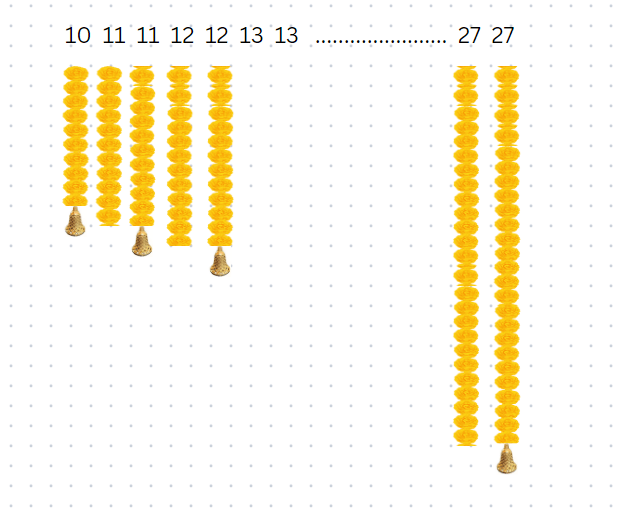
- Create a pattern as shown below. Smallest garland starts with 10 flowers and a bell. Next one, is 11 flowers ONLY. Third one, would be 11 flowers and a bell. Continue until you reach 27 flowers and a bell. This will be your longest garland. Make sure you leave enough thread at the end to tie them back to our ring. You should now have 27 garlands.
- Now that the complex part is done. Let’s move to the easy and most satisfying part. Assembling it together. Take your 10″ ring, and start with tying your smallest garland.
- Move around until you reach the largest garland, and Tada!! Chandelier is DONE. Well, almost.


- If you are bougee like me, let’s take it to next level with these steps. I took the large bell and tied it with the bangle decor and attached using a nylon thread. Length of this would be slightly larger than your longest flower garland.
- Use the same thread to create a X on your ring. Tie your larger bell in the center. Your basic chandelier is ready at this point and you can hang it to your ceiling using a C hook.

Installing multiple chandeliers together
Since I had 5 such chandeliers, this is how we installed them.
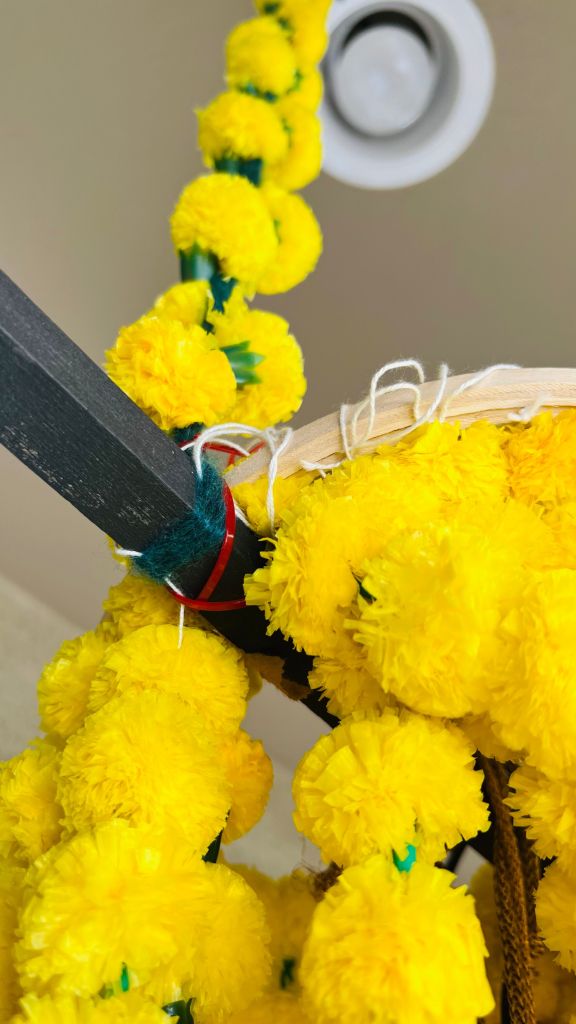
- Took a long wood square dowel. I rest one side of the dowel on a ladder and other side on a different ladder, so I have an elevated surface to work on.

- Placed center of chandelier on this dowel and secured it using two zip ties on each side. See below.
- To install this outdoor, we added two C hooks on the ceiling and added a basic knotted rope on both sides. Once this was done, we simply slid the wood dowel between the ropes.
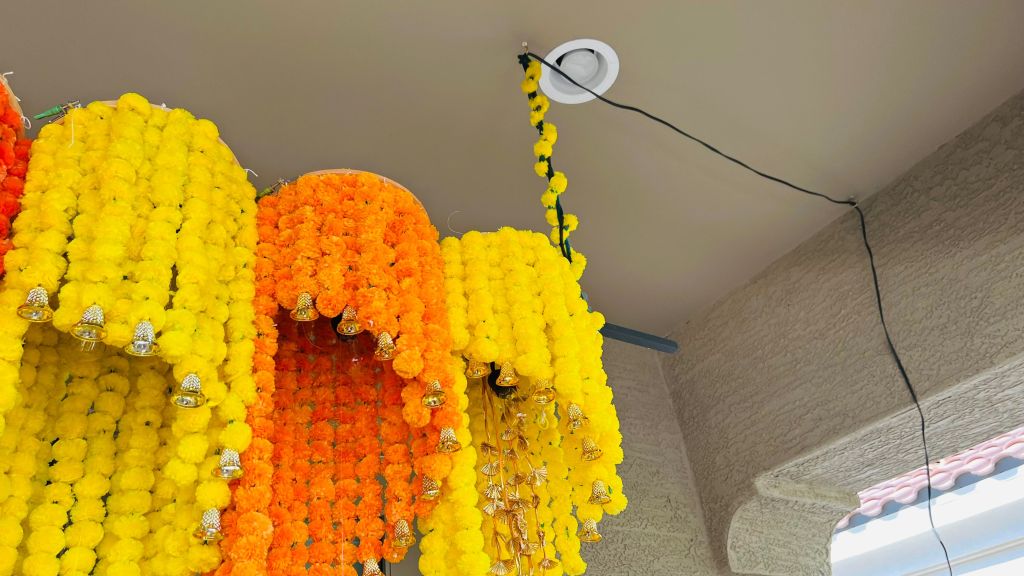
- To finish it, we added some string lights that just sit on top of the wooden dowels and was connected to power source..

If this chandelier idea inspires and you decide to recreate it, do tag or share with me. I would LOVE to see!!
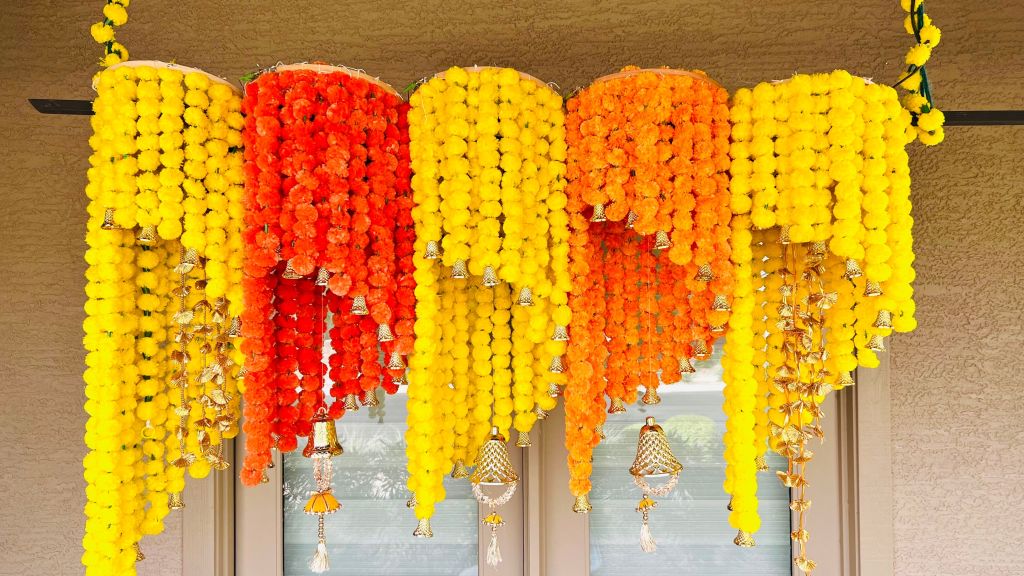
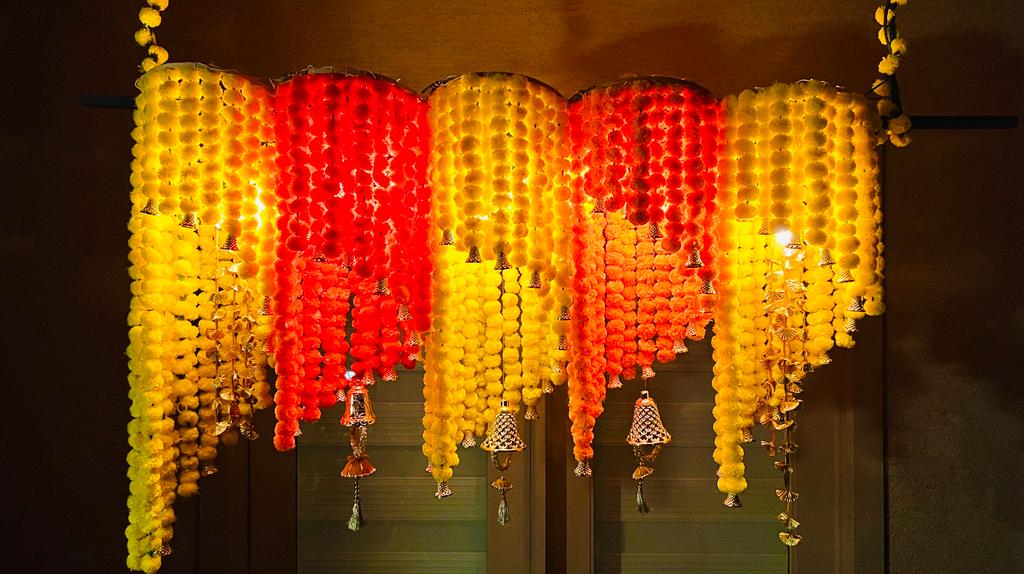
With that leaving you with some stills of this beauty and our next gen 🙂

15 responses to “DIY Diwali Marigold Chandelier”
-
Popped into my timeline, gorgeous… 🇹🇹
LikeLike
-
Thank you 🙂
LikeLike
-
Beautiful
LikeLike
-
This is gorgeous. I have already started making it. Can you share the link of what kind of rope you used?
LikeLike
-
This is si beautiful
LikeLike
-
This is si beautiful and creative, i will try a smaller version soon.
LikeLike
-
Yay! I am so excited for you. Do share with me once you are ready.
LikeLike
-
Extremely beautiful diy . How lucky you are to have the support and love of your parents . What a kind gesture of love and affection by them for you . 🌺🌺
LikeLike
-
Oh how exciting! To hang the entire chandelier on the C hook right? To be honest, it is just a piece of yarn that was lying around and the first thing I saw when I went looking for a rope 🙂
LikeLike
-
aww thank you!
LikeLike
-
I definitely am.. Counting my blessings!!
LikeLike
-
Beautiful , great diy
LikeLike
-
Thank you!!
LikeLike
-
This is so beautiful!!!
LikeLike
-
Thank you so much!
LikeLike
Share this:

Categories: Beginner Friendly, Diwali, DIY, Easy Build

Leave a comment