
There’s nothing quite like the magic of creating something beautiful with the most special person in your life. That’s why I’m thrilled to share our latest endeavor: DIY curtains handcrafted with love and creativity, side by side with none other than my amazing mom! The joy of crafting together made the curtains more than just pieces of fabric; they became tokens of our cherished bond and a testament to the magic of mother-daughter teamwork.
I had these plain IKEA curtains that needed a personal touch and a pinch of creativity! Block printing is a fantastic way to add unique patterns and designs to fabric, turning a simple curtain into a work of art. In this step-by-step guide, we will explore how to use block print to create a captivating design on an IKEA curtain and then elevate it further by crafting a pinch-pleated curtain. Get ready to unleash your creativity and transform your living space with this engaging DIY project.
Materials Needed:
- IKEA curtain (plain and light-colored)
- Fabric paint suitable for block printing
- Wooden block stamps or custom-made block designs
- Foam brush
- Craft paper or cardboard sheet
- Pleat hooks
- Steam Iron or regular iron with board
- Curtain rings with hooks
- Curtain rod
- Iron On Hem
- Curtain glide tape
Step 1: Prepare Your Workstation Lay out craft paper or newspaper on a flat surface to protect it from paint spills. Place your plain IKEA curtain on top of the paper, making sure it’s free of any creases or wrinkles.
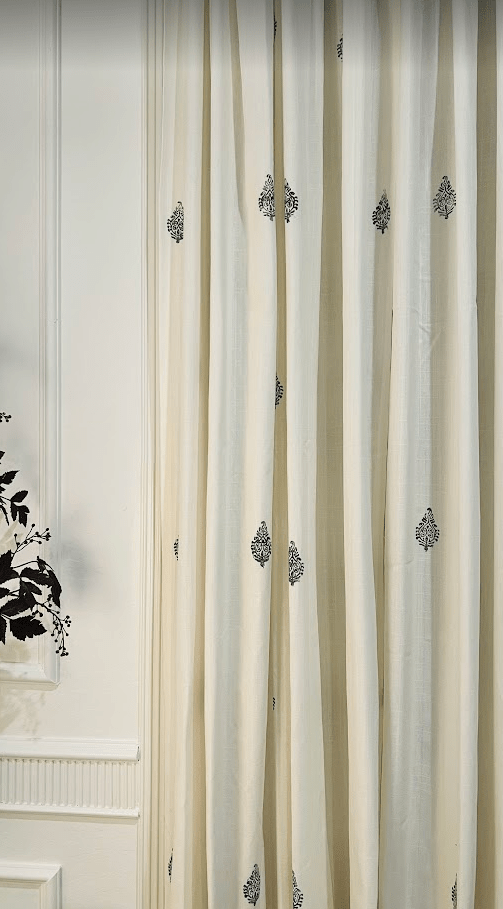
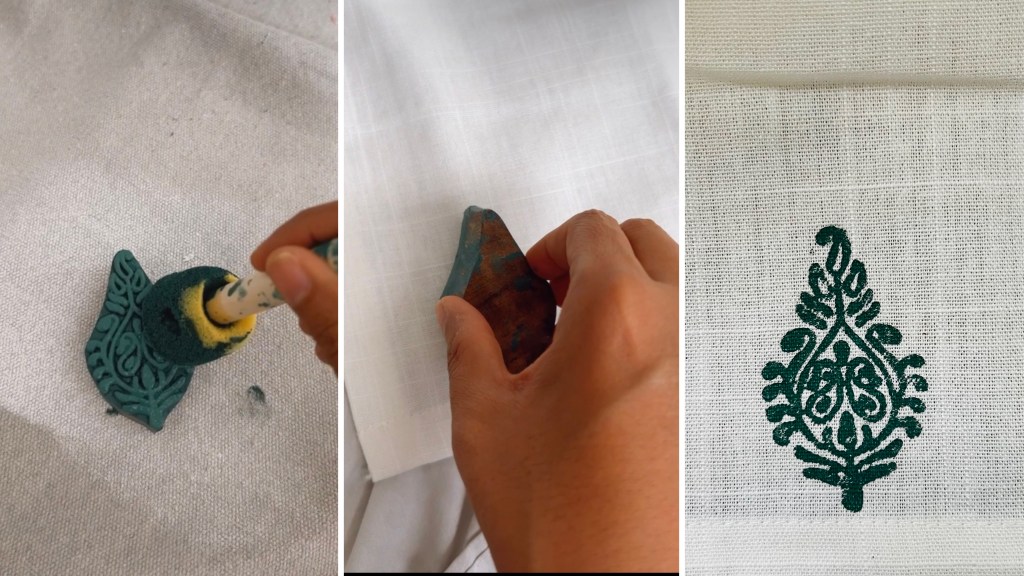
Step 2: Create Your Block Print Design Dip your foam brush into the fabric paint and gently press it onto the wooden block stamp to ensure even distribution. Now, carefully stamp the block design onto your curtain. You can create a pattern, a motif, or an all-over design – the choice is yours. I built a 12inch square template that I used to space the pattern around. Take your time to align the prints neatly and symmetrically for a professional finish. Allow the paint to dry completely before moving on to the next step.
Step 3: Crafting Pinch-Pleats Measure the width of your curtain and decide on the number of pleats you want. Typically, four or five pleats per panel work well for most curtains. Use a fabric pen or chalk to mark the locations where you’ll create the pleats, ensuring they are evenly spaced. I used the IKEA Ritva curtains and I marked third pocket next to every thread. See picture below.

Step 4: Folding and Pinning Fold the curtain at each marked point to create a pleat, making sure the fabric is aligned neatly. Use pins to secure the folds in place, ensuring they stay put while you sew. This gets tricky and annoying sometimes. You should have one hook with 4 prongs and each prong should go in the location numbered above.

Step 5: Sewing the Pleats Once you have all the pleats secured in the hooks, use a needle and thread to sew the pleats in place. This step makes such a big difference in the appearance of your pleat.

Step 6: Ironing and Finishing Once the pleats are sewn, iron the curtain to remove any wrinkles and give it a polished look. Ironing will also help the block print design set permanently. This step also trains your curtains.
Step 7: Shortening the curtains Sometimes the curtains may be longer than your wall height and in such cases you may have to hem the edges and shorten them to your desired length. Hemming iron-on bands, also known as fusible hem tape, are a convenient and easy way to shorten the length of curtains without sewing. Determine the desired new length of your curtains and mark it using some pins. It’s a good idea to hang the curtains and adjust them to the correct length while taking into account any floor or sill clearance you may need. Unroll the hem iron-on bands and cut them to match the width of the cut edge of your curtains. Lay the curtain on an ironing board, making sure the hem bands are still in place. Set your iron to the appropriate temperature setting for the fabric of the curtains (refer to the iron-on bands’ packaging for instructions). Press the iron firmly and evenly over the hem bands for the specified time (typically a few seconds) to activate the adhesive and secure the hem. Allow the curtain to cool down for a few seconds before moving it to prevent the hem from loosening.

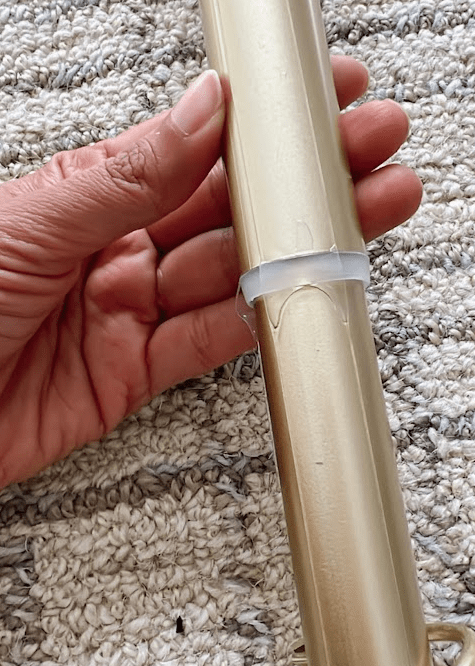
Step 8: Hanging the Curtain This step is optional but I swear by these curtain glide tapes. Attach them to your curtain rods and prevent your curtain rings from getting stuck while moving them.
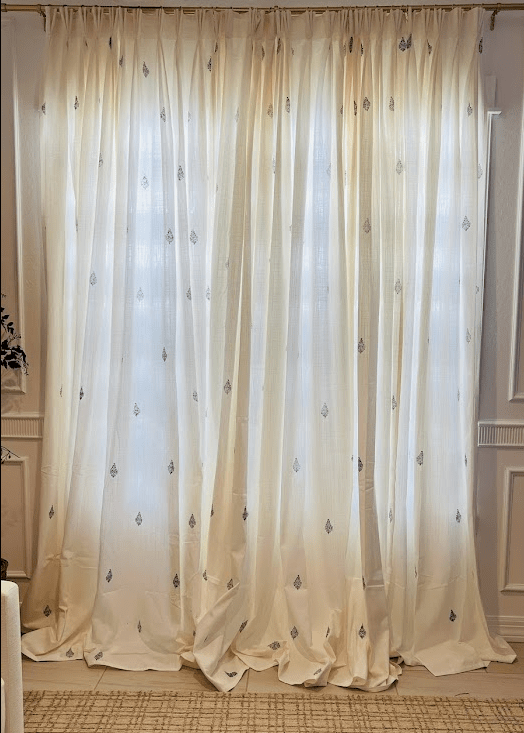
Attach curtain rings with hooks to the top of your pinch-pleated curtain. These rings will slide easily onto the curtain rod, giving your finished product a beautiful, tailored look.

Creating DIY curtains with mom was a heartwarming and unforgettable experience. With each stitch, we weaved our love and creativity into the fabric, transforming it into something truly special. These curtains are more than just window dressings; they’re a symbol of the bond we share and the cherished moments spent crafting something extraordinary together. They’ll forever hold a special place in our hearts and our home, a reminder of the love and care woven into every stitch.
With block printing and a pinch of creativity, you’ve transformed an ordinary IKEA curtain into a unique, personalized masterpiece that adds character and charm to your living space. The combination of block print and pinch pleats elevates the curtain to a whole new level, showcasing your creative flair and crafting skills. Enjoy the sense of accomplishment that comes with creating a one-of-a-kind piece of decor that reflects your individuality and style. Happy crafting!
Frequently Asked Questions
Does the print wash well?
Honestly, I have not washed them yet. But, the fabric paint I used is washable. After the paint has dried completely, heat set it to make it more permanent. This can typically be done by ironing the painted fabric on the appropriate setting (check the fabric paint instructions for the recommended temperature and duration). Heat setting helps bond the paint to the fabric fibers, improving its wash resistance. So, I think it should be ok to wash without having any issues.
How did you ensure the pattern lined up?
I did mention using a 12×12 template which I placed diagonally and stamped at all the edges. See below

Share this:

Categories: DIY, Home Decor

Wow!!
LikeLike
Amazing!
LikeLike
Beautiful! How much did it cost for the whole project?
LikeLike
How long should the block print dry on cloth surface? What are the ways to fix the colour? Any varnish required? What are the wash care instructions after block painting? Thanks for the share.
LikeLiked by 1 person
I left it to dry for a day. After the paint has dried completely, heat set it to make it more permanent. This can typically be done by ironing the painted fabric on the appropriate setting (check the fabric paint instructions for the recommended temperature and duration). Heat setting helps bond the paint to the fabric fibers, improving its wash resistance.
LikeLike
Thank you!!
LikeLike
Thanks!!!
LikeLike