
DIY Marble Backsplash: A Stunning Transformation with Wood and TotalBoat Epoxy
Are you looking to give your vanity a stylish and unique makeover without breaking the bank? Creating a DIY marble look using wood and epoxy is a fantastic way to achieve a high-end look at a fraction of the cost. In this step-by-step guide, I will walk you through the process of creating this stunning and budget-friendly project.
I revamped a Facebook Marketplace vanity, giving it an elegant marble-like finish. This technique is incredibly versatile and can be applied to various surfaces, including tabletops, coffee tables, and even backsplashes, offering a myriad of creative possibilities.
Materials You’ll Need:
- Wooden Backer Board: Choose a plywood or MDF (Medium-Density Fiberboard) backer board, cut to the size of your backsplash area.
- TotalBoat Epoxy Resin: TotalBoat epoxy is known for its high-quality finish and durability. Make sure to get enough for your project, including both the resin and hardener.
- Black paint
- Paints and Brushes: Acrylic paint in white, gold, and gray, as well as paintbrushes, will be used to create the marble effect.
- Clear Tape: To create clean lines and protect areas you don’t want epoxy on.
- Mixing Cups and Stirring Sticks: Necessary for mixing epoxy.
- Heat Gun : To remove air bubbles from the epoxy.
- Sandpaper: To smooth surfaces and prep the backer board.
- Safety Gear: Gloves, safety glasses, and a well-ventilated workspace are essential when working with epoxy.
I was working on my laundry room makeover and I knew it needed to include a utility sink. This sink can be used for various tasks, such as hand-washing delicate items, cleaning muddy shoes, or even bathing pets. I was going for a vintage vibe and found the perfect one on Facebook Marketplace.

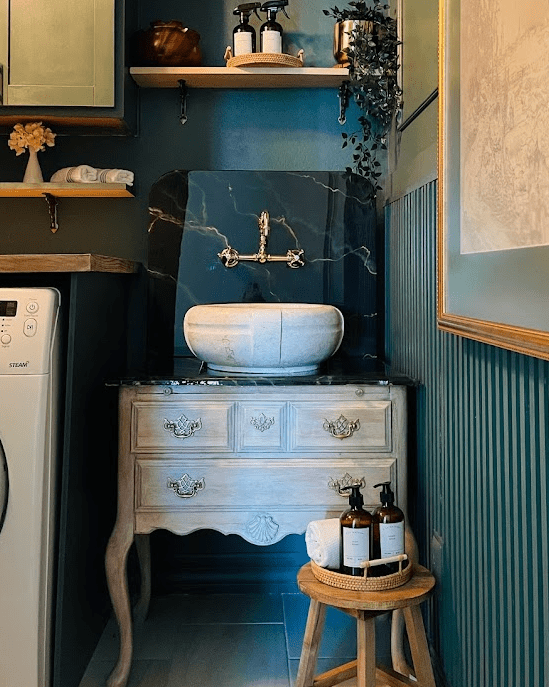
This FBMP sink was painted white, so I striped the paint and sanded to expose the underneath natural wood. I loved the wood tone so I simply left it natural and sealed it with polyacrylic. Next, I wanted to add a marble top and backsplash but it was not in my budget so I decided to use epoxy to give it same look and effect. Let’s take a look at how it’s done.
Step 1: Prepare the Backer Board
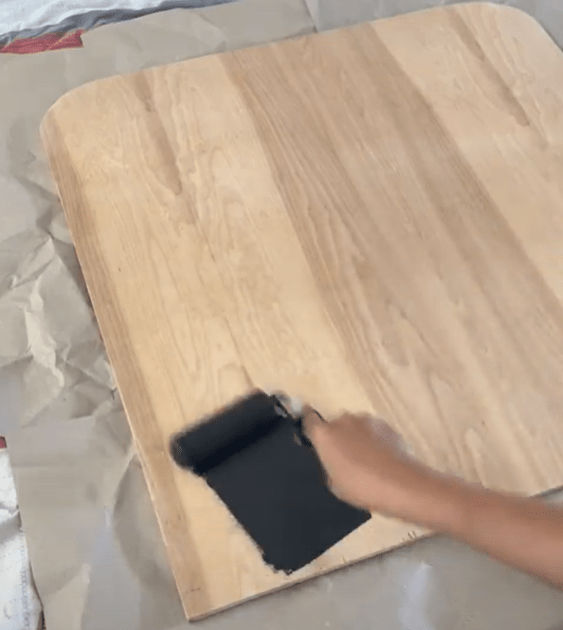
- For the backsplash we used a 28″x 28″ half inch plywood board. Then, rounded the edges of this square using a jigsaw. Start by sanding the wooden backer board to create a smooth surface for the epoxy. Remove any dust before moving on.
Step 2: Paint and veining
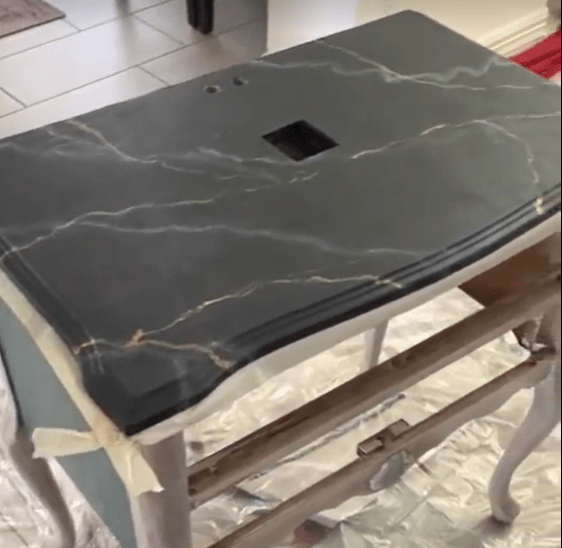
- Next, we painted both the vanity top and backer board black. Now was the time to get creative and create the marble pattern. Mix your white, golden, and gray acrylic paints to create the desired shades for your faux marble. Experiment with different swirls and patterns to achieve a natural marble look. Using a thin paintbrush draw marble veins on the board. Spray with some water and blend. Let it dry completely. I used a marble contact paper as reference to play around with the pattern.


Optional Step 3: Use Marble Contact paper
- Optionally you can also cover your surface with marble contact paper. Since my vanity had many curves and details, I decided to paint the pattern instead.
Step 4: Prep the working area
Epoxy can be messy, so it’s essential to protect the surrounding area from accidental spills and drips. You can use drop cloths, plastic sheeting, or disposable plastic covers to shield nearby surfaces and objects. Epoxy resin can release fumes, so it’s crucial to work in a well-ventilated area. Open windows and doors to allow fresh air to circulate. If working in a confined space, consider using fans or exhaust systems to improve ventilation.
Epoxy can be irritating to the skin and eyes, so it’s essential to wear appropriate personal protective equipment (PPE). This typically includes disposable gloves, safety glasses or goggles, and a long-sleeved shirt or apron. Before you start mixing and pouring epoxy, have all your tools and equipment ready. This includes mixing containers, stirring sticks, a heat gun or torch (for removing air bubbles), and any additional materials you’ll need for your specific project.
Ensure that the temperature and humidity conditions in your workspace are within the recommended range for the epoxy product you’re using. Extreme temperature variations can affect the curing process. If the surface you’re pouring epoxy onto is not level, use leveling tools (such as shims or leveling compound) to ensure that the epoxy spreads evenly and creates a flat surface.

Step 5 : Prepare the Epoxy
- Epoxy has a limited working time, often referred to as its “pot life.” This is the amount of time you have to work with the epoxy after mixing before it begins to cure and harden. Pot life varies depending on the specific epoxy product but is typically in the range of 20 minutes, so it’s essential to work in sections and only mix epoxy for that section. Follow the instructions on your TotalBoat epoxy kit to mix the resin and hardener thoroughly. Make sure you pour enough to cover your working surface. As per instructions, I mixed equal part of resin and hardener, making sure your container has enough room to mix the epoxy. Mix the batch really well for 2-3 minutes and transfer it to another container. Continue to mix for another 2-3 minutes. Ensure accurate measurements and stir until no streaks remain. Incomplete mixing can lead to curing issues.

Step 6: Pour and Spread the Epoxy
- Carefully pour the mixed epoxy onto the prepared marble surface. Use a spreader or a notched trowel to evenly distribute the epoxy, making sure it covers the entire area.


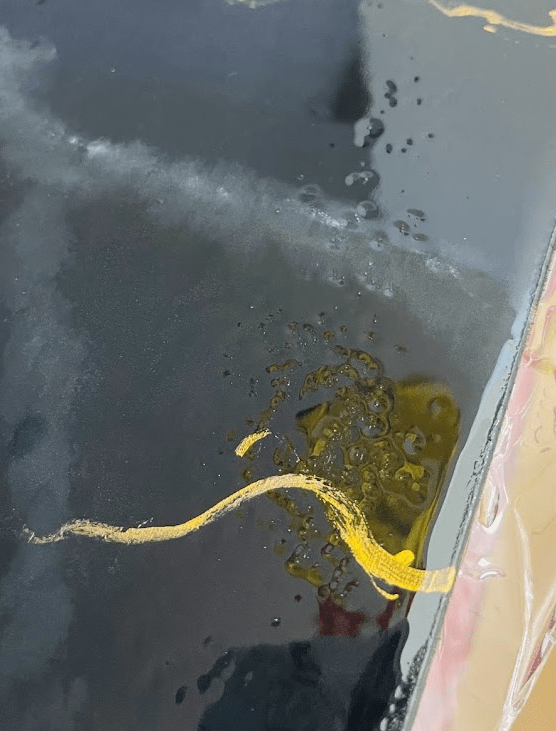
Step 7: Remove Air Bubbles
- Quickly run a heat gun or torch over the epoxy to remove any air bubbles that may have formed during the pouring process.


Step 8: Let It Cure
- Allow the epoxy to cure according to the manufacturer’s instructions. This typically takes 24 to 72 hours.
Optional Step 9: Sand and re-apply
After cure if the end result doesn’t turn out the way you had expected, dont panic. You can sand the epoxy and try again. Sometimes the wood surfaces can be porous leaving uneven epoxy cure. In the pic below, the vanity top had a lot of such uneven spots. I sanded the top with 180 grit sandpaper and applied a new coat.
Step 10: Final Touches
- Once the epoxy is fully cured, remove any painter’s tape, and your DIY marble backsplash is complete! Clean up any drips or excess epoxy around the edges with a razor blade.
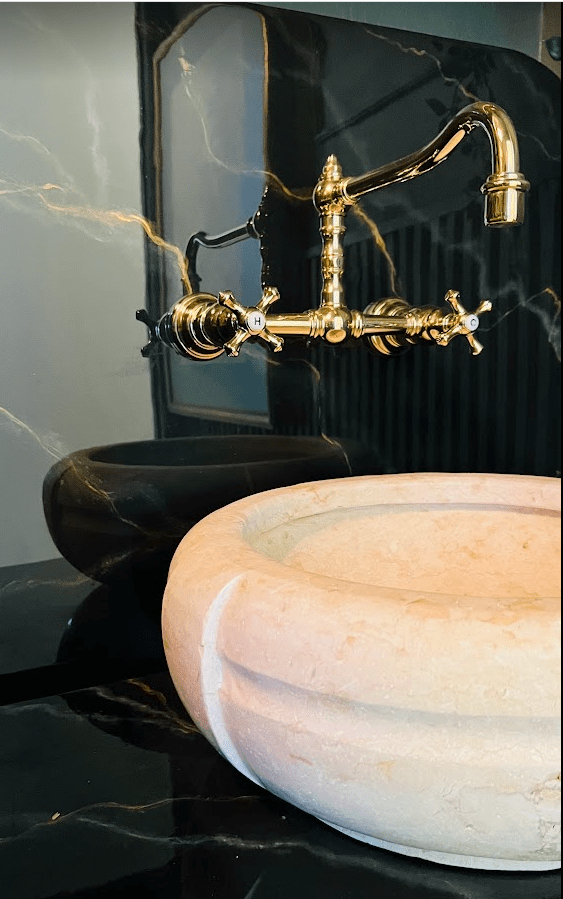
- To attach our faucet we drilled hole at the connection points and voila it was done!!

We get so many compliments on our laundry room, and they’re always amazed to find out that the vanity isn’t real marble—it’s a fake, but it looks so good that nobody can tell!


Creating a DIY marble backsplash using wood and TotalBoat epoxy is a cost-effective and rewarding project that can transform the look of your project. With some creativity and attention to detail, you can enjoy the elegance of marble without the hefty price tag. Happy crafting!
Share this:

Categories: Uncategorized
